Red Hat CodeReady ContainersをMacBook Pro / macOS Catalina にインストールする
大まかな流れとしては、以下となります。
- CodeReady Containersをダウンロードする
- crc-macos-amd64.tar.xzを解凍する
- PATHを通す
- crc setup、crc startを実行する
一部、macならではのお作法がありますが、予想以上にスムーズかと思います。
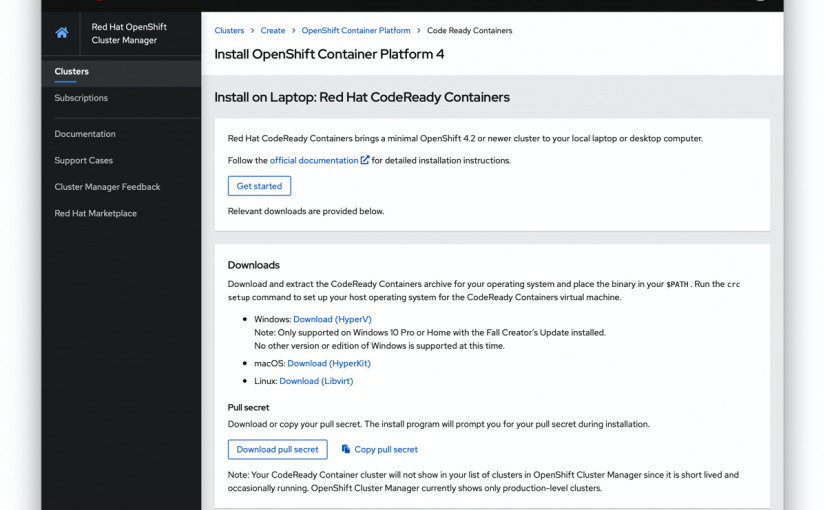
1. CodeReady Containersをダウンロードする

ダウンロードページから、CodeReady Containersのアーカイブをダウンロードします。
約2.26GBのアーカイブでした。
2. crc-macos-amd64.tar.xzを解凍する
ダウンロードフォルダにダウンロードされますので、crc-macos-amd64.tar.xzファイルをダブルクリックして、解凍します。
crc-macos-1.11.0-amd64フォルダができます。

中身は、2.28GBのcrcファイルと、doc.pdf、LICENSEの3つのファイルが生成されました。
3. PATHを通す
(1) フォルダを/usr/local/以下に配置
PATHが通っている場所に展開するように手順に記載がありますので、
解凍したフォルダを、/usr/localの下に持っていきます。
フォルダ名が長いので、シンボリックリンクを作成しておきます。
$ sudo mv ~/Downloads/crc-macos-1.11.0-amd64/ /usr/local
$ sudo ln -s crc-macos-1.11.0-amd64 crc
(2) PATHを追加
$ vi .bash_profile
以下をファイル最後尾に追加
# Setting PATH for Red Hat CodeReady Containers
PATH="/usr/local/crc:${PATH}"
export PATH
(3) 一度、ターミナルを終了して、再度ターミナルを立ち上げます。
$ env

PATH=/usr/local/crc: 〜
PATHが通っていることを確認します。
(4) crcコマンドを実行します。
crcコマンドへのPATHが通ってますので、crcコマンドを実行します。
$ crc
ところが、以下のようなメッセージが表示され、実行できません。

(5) Finderから、crcコマンドを右クリックして、「開く」をクリックします。
“Crc”の開発元を検証できません。開いてもよろしいですか?とダイアログボックスが表示されますので、「開く」をクリックします。

ターミナルが新たに開き、crcコマンドの実行結果が表示されます。
No command given
CodeReady Containers is a tool that manages a local OpenShift 4.x cluster optimized for testing and development purposes

Usage:
  crc [flags]
  crc [command]

Available Commands:
  cleanup     Undo config changes
  config      Modify crc configuration
  console     Open the OpenShift Web Console in the default browser
  delete      Delete the OpenShift cluster
  help        Help about any command
  ip          Get IP address of the running OpenShift cluster
  oc-env      Add the 'oc' binary to PATH
  podman-env  Setup podman environment
  setup       Set up prerequisites for the OpenShift cluster
  start       Start the OpenShift cluster
  status      Display status of the OpenShift cluster
  stop        Stop the OpenShift cluster
  version     Print version information

Flags:
  -f, --force              Forcefully perform an action
  -h, --help               help for crc
      --log-level string   log level (e.g. "debug | info | warn | error") (default "info")

Use "crc [command] --help" for more information about a command.
logout
Saving session...
...copying shared history...
...saving history...truncating history files...
...completed.
こちらの対処法ですが、GitHubに乗っていました。
https://github.com/code-ready/crc/issues/836
(6) バージョンを確認する
うまく実行できましたので、バージョンも確認しておきましょう。
$ crc version
crc version: 1.11.0+883ca49
OpenShift version: 4.4.5 (embedded in binary)
4. crc setup、crc startを実行する
(1) crc setupコマンドで、CodeReady Containers VMをセットアップします。
途中ユーザーアカウントのパスワードを聞いてきますので、パスワードを入力します。
$ crc setup
INFO Checking if oc binary is cached
INFO Caching oc binary
INFO Checking if podman remote binary is cached
INFO Checking if goodhosts binary is cached
INFO Caching goodhosts binary
INFO Will use root access: change ownership of /Users/naoya/.crc/bin/goodhosts
Password:


INFO Will use root access: set suid for /Users/naoya/.crc/bin/goodhosts
INFO Checking if CRC bundle is cached in '$HOME/.crc'
INFO Unpacking bundle from the CRC binary
INFO Checking if running as non-root
INFO Checking if HyperKit is installed
INFO Setting up virtualization with HyperKit
INFO Will use root access: change ownership of /Users/naoya/.crc/bin/hyperkit
INFO Will use root access: set suid for /Users/naoya/.crc/bin/hyperkit
INFO Checking if crc-driver-hyperkit is installed
INFO Installing crc-machine-hyperkit
INFO Will use root access: change ownership of /Users/naoya/.crc/bin/crc-driver-hyperkit
INFO Will use root access: set suid for /Users/naoya/.crc/bin/crc-driver-hyperkit
INFO Checking file permissions for /etc/resolver/testing
INFO Setting file permissions for /etc/resolver/testing
INFO Will use root access: create dir /etc/resolver
INFO Will use root access: create file /etc/resolver/testing
INFO Will use root access: change ownership of /etc/resolver/testing
Setup is complete, you can now run 'crc start' to start the OpenShift cluster
「Setup is complete, you can now run ‘crc start’ to start the OpenShift cluster」と表示されたら、セットアップは完了です。
(2) crc startコマンドで、CodeReady Containersを起動します。
途中、「? Image pull secret」と表示され、pull secretを入力する場面があります。
事前に以下の画面で「Copy pull secret」をクリックして、pull secretをコピーし、
ターミナルにpasteしてください。

$ crc start
INFO Checking if oc binary is cached
INFO Checking if podman remote binary is cached
INFO Checking if goodhosts binary is cached
INFO Checking if running as non-root
INFO Checking if HyperKit is installed
INFO Checking if crc-driver-hyperkit is installed
INFO Checking file permissions for /etc/resolver/testing
? Copy it from https://cloud.redhat.com/openshift/install/crc/installer-provisioned
? Image pull secret


? Image pull secret ***************************************************************************************************************************************************************************************************************************************************************************************************************************************************

INFO Extracting bundle: crc_hyperkit_4.4.5.crcbundle ...
かなり時間がかかる感じです。
INFO Checking size of the disk image /Users/naoya/.crc/cache/crc_hyperkit_4.4.5/crc.qcow2 ...
INFO Creating CodeReady Containers VM for OpenShift 4.4.5...
INFO CodeReady Containers VM is running
INFO Verifying validity of the cluster certificates ...
INFO Restarting the host network
ERRO Host is not connected to internet.
INFO Check internal and public DNS query ...
INFO Check DNS query from host ...
INFO Generating new SSH key
INFO Copying kubeconfig file to instance dir ...
INFO Starting OpenShift kubelet service
INFO Configuring cluster for first start
INFO Adding user's pull secret ...
INFO Updating cluster ID ...
INFO Starting OpenShift cluster ... [waiting 3m]
INFO
INFO To access the cluster, first set up your environment by following 'crc oc-env' instructions
INFO Then you can access it by running 'oc login -u developer -p developer https://api.crc.testing:6443'
INFO To login as an admin, run 'oc login -u kubeadmin -p 8rynV-SeYLc-h8Ij7-YPYcz https://api.crc.testing:6443'
INFO
INFO You can now run 'crc console' and use these credentials to access the OpenShift web console
Started the OpenShift cluster
WARN The cluster might report a degraded or error state. This is expected since several operators have been disabled to lower the resource usage. For more information, please consult the documentation
inouenaoyanoMacBook-Pro:~ naoya$
「Started the OpenShift cluster」と表示されれば、起動は完了しています。
(3) 次に、コンソール画面にアクセスします。
「crc console」コマンドを実行すると、ブラウザが立ち上がり、CodeReady ContainersのWeb Console画面が表示されます。
$ crc console
Opening the OpenShift Web Console in the default browser...

Developerアカウントでログインします。
先ほどの、crc startコマンド実行時の出力にありますが、developerアカウントとパスワードが表示されますので、こちらをweb consoleで入力して、ログインします。

ログインが完了すると、以下のようなホーム画面が表示されます。

いかがでしたか?
比較的簡単にセットアップができたのではないかと思います。
次の記事では、CodeReady ContainersのWeb Consoleの操作を見ていこうと思います。